Hey learners,
In the digital world, having a personalised domain for your blog is crucial. It not only improves the professionalism of your blog, but also helps with brand development and SEO optimisation. This article will lead you through the steps necessary to easily connect your Hostinger domain to your Blogger account.
 |
| Connecting Your Hostinger Domain to Blogger: A Step-by-Step Guide |
Connecting Your Hostinger Domain to Blogger: A Step-by-Step Guide
Understanding Hostinger and Blogger
- Before diving into the connection process, let's understand the platforms involved. Hostinger is a popular web hosting provider known for its affordable pricing and reliable services. It offers a range of services, including web hosting, domain registration, and professional email setups.
- Blogger, owned by Google, is a free blog-publishing service that is user-friendly and perfect for beginners. By combining Hostinger's domain services with Blogger's capabilities, you can give your blog a professional edge. Now, let’s get started on how to connect your Hostinger domain to your Blogger account.
How to connect a Hostinger domain to Blogger
Preparing Your Hostinger Domain
The first step is to ensure that your Hostinger domain is ready for connection. Log into your Hostinger account and navigate to your domain management dashboard. Here’s what you need to do:
- Locate your domain and click on the Manage button.
- Access the DNS and Name Server settings.
- Delete any existing DNS records that may interfere with the connection process.
Don’t worry about deleting these records; it won’t cause any issues for your domain. This step is crucial because having old records can prevent your new settings from taking effect.
Configuring DNS Settings
Once you have cleared out the old DNS records, you need to set up the new ones that will connect your domain to Blogger. Follow these steps:
- Go to your Blogger account and click on Settings.
- Scroll down to the Custom Domain section and enter your domain name. Make sure to include www before your domain (e.g., www.yourdomain.com).
- Click Save.
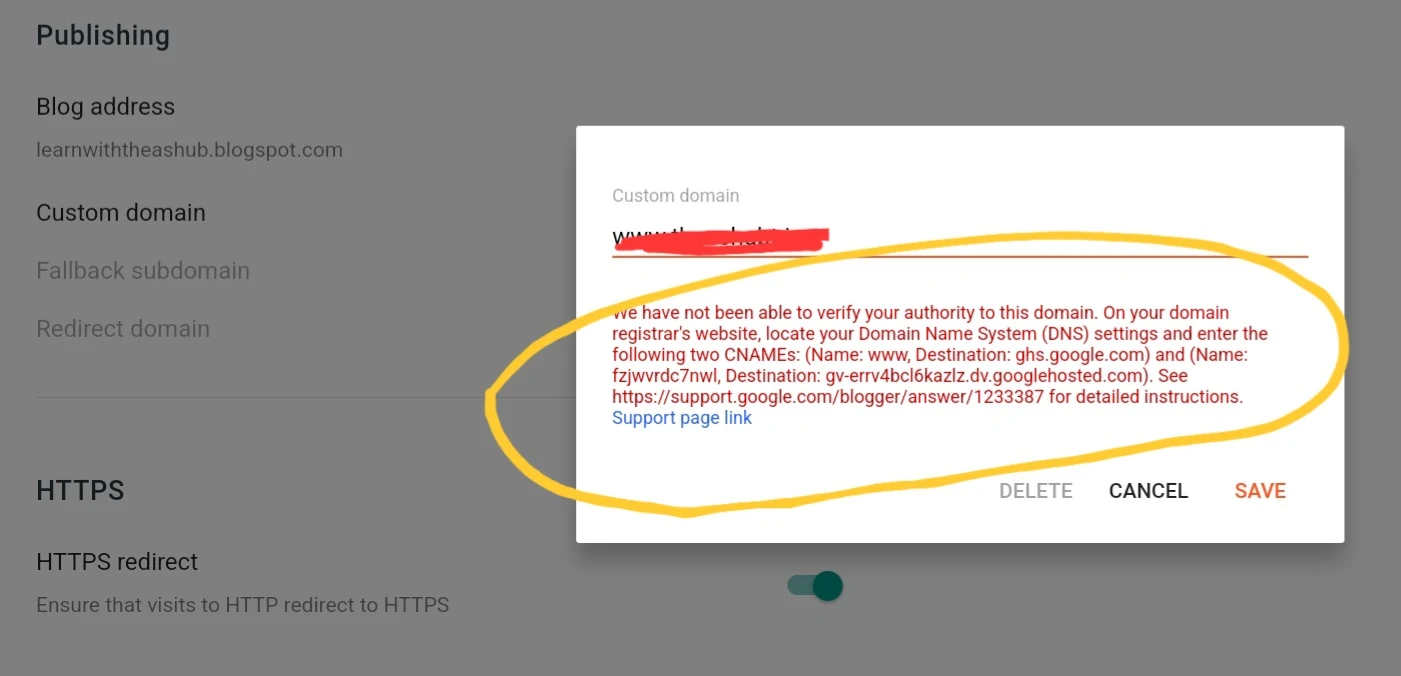
After saving, Blogger will provide you with some CNAME records that you need to add to your Hostinger account. Make sure to keep this page open for reference.
Adding CNAME Records in Hostinger
After clickingon save button this dialogue will open which contain details of CNAME.

Now, you will return to your Hostinger account to add the CNAME records provided by Blogger. Here’s how:
- In the DNS management section of Hostinger, add a new CNAME record.
- For the Name, enter www.
- For the Target, copy the destination provided by Blogger and paste it here.
- Click Add Record to save the changes.
Repeat this process for any additional CNAME records Blogger provides. Typically, there will be at least two records to add.
Adding A Records
Click on support page link. In addition to t8he CNAME records, you might also need to add A records to ensure that your domain works without the www prefix. Here’s how to do that:

In the DNS settings of Hostinger, add four A records using the following IP addresses:
- 216.239.32.21
- 216.239.34.21
- 216.239.36.21
- 216.239.38.21
You can simply find these records by clicking on support page link as shown by blogger.
For each A record, leave the Name field blank or input your root domain (e.g., yourdomain.com.
Click Add Record after each entry.
Saving and Testing Your Configuration
After adding all necessary records, return to your Blogger settings. You should now see a confirmation that your domain settings are correct. If you encounter any issues, double-check the records you entered against those provided by Blogger.
Enabling HTTPS
Once your domain is connected, you want to ensure that your blog is secure. Blogger allows you to enable HTTPS for your custom domain. Here’s how to do it:
In the Settings section of Blogger, find the HTTPS Availability option.
Toggle it to Yes to enable HTTPS for your blog.
Additionally, enable the Redirect HTTP to HTTPS option to ensure all traffic is secure.
Final Check and Wait
After saving all your settings in Blogger, it’s essential to wait. DNS changes can take anywhere from a few minutes to 24 hours to propagate globally. During this time, your blog may not be accessible immediately.
After some time, refresh your browser and try accessing your domain. If everything is set up correctly, you should see your Blogger site live on your custom Hostinger domain!
Common Issues and Troubleshooting
Even with a straightforward process, you might encounter some common issues. Here are some troubleshooting tips:
- Domain Not Loading: Double-check your DNS settings in Hostinger to ensure that all records are correctly entered.
- HTTPS Issues: If HTTPS isn’t working, ensure you enabled it in Blogger settings and wait for the changes to propagate.
- Propagation Time: Remember that DNS changes can take time. If your site isn’t live immediately, give it a few hours.
Conclusion
Connecting your Hostinger domain with Blogger is a great way to enhance your blog's professionalism and brand identity. By following the steps outlined in this guide, you can have your custom domain up and running in no time. Don't hesitate to reach out if you encounter any issues during the process. Happy blogging!
Frequently Asked Questions
Can I use a free domain from Hostinger with Blogger?
No, you need a paid domain to connect it with Blogger.
How long does it take for the DNS changes to take effect?
It can take anywhere from a few minutes to 24 hours.
What if my Blogger site doesn’t load after connecting the domain?
Check your DNS settings and ensure you've entered the CNAME records correctly. Also, clear your browser cache.
Can I disconnect my Hostinger domain from Blogger later?
Yes, you can remove the custom domain from Blogger settings and use it elsewhere.
How can I contact Hostinger support if I need help?
You can reach Hostinger support through their website's live chat or email support.
